[UPDATE June 2020] Spilt water on my computer last month and while I was trying to fix it I completely messed up the netwok interfaces and sources.list to the extend that I have to reinstall the Linux distro; Thought I’d update this post I wrote almost over 2 years ago. Hope this help you:)
1. What you need
- A USB stick/flash drive. Official guide from Ubuntu website says at least 4GB, personally, I used a 30GB stick. (Too big I know but just to be safe)
- MS Windows XP or later that is working on the PC.
- Rufus/ Ultral OS/ Universal USB Installer etc: A tool that can write Ubuntu ISO(Download Here) to your USB to install later. Choose this carefully. Some common installation issues are caused by the tools you choose.
- Enough unallocated space on disk.
2. Make your bootable USB stick
Before we start, I wanna emphasize one thing: Always check your disk file format.
There are 2 ways of partitioning drive: MBR(Master Boot Record) and GPT(GUID Partition Table)(To check your format, go to disk management and right click your disk 0 to see properties, mine is MBR). So what’s the difference between MBR and GPT? Well, MBR is old and GPT is new. But as “But the new is not always better than the old.“ I quoted here, they all have their own pros and cons.
GPT disk can support larger than 2TB while MBR cannot. They can both be dynamic and basic. Also, GPT can supports up to 128 partitions while MBR can only support four primary ones.
Usually, we associate MBR + BIOS and GPT + UEFI together. If a Windows pc uses UEFI, it will only support GPT.
Write downloaded Ubuntu ISO to your USB stick. This USB will be formatted so remember to back up data. Remember to choose Partition scheme to MBR and File system is FAT32(Default).
PLease also check Ubuntu official guide
3. Get into Boot Menu
Restart PC. Know your shortcuts to enter the boot menu. For Thinkpad it’s F12. After the Leveno red sign shows on screen quickly press it before the sign disappears. There will show a line in white color: Entering Boot Menu.
Here are some shortcuts for other PCs. Since I haven’t tried them all myself, I strongly suggest you verify before actually start:
Leveno PC: F12 or F1
Dell laptop: F12
HASEE laptop: F2
Sony laptop: DEL or F2 or F9
Samsung laptop: F10
IBM Pc: F12
Then you will see something like this:(Disclaimer: I took the image from this website, I do not own the copy right of this file)
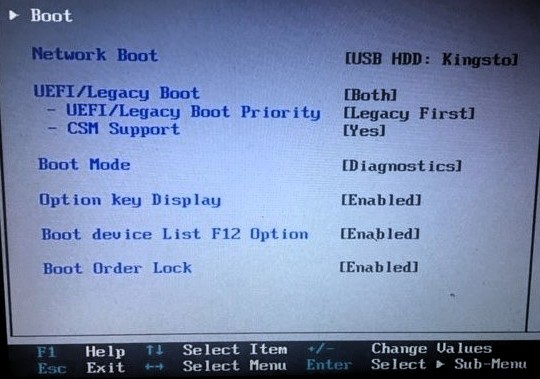
- disable Secure Boot after entering boot menu.
- Turn boot priority into
Legacy Firstsince the disk format is MBR. - Choose USB stick for boot queue.
UEFI/Legacy Boot                 [Both]

UEFI/Legacy Boot Priority        [Legacy First]

CSM Support                      [Yes]
Enter esc + y to save and exit.
4. Now install Ubuntu!
If things go well, after select USB in the boot menu, you should be directed to a menu with the list of “Try Ubuntu”, “Install Ubuntu”, …
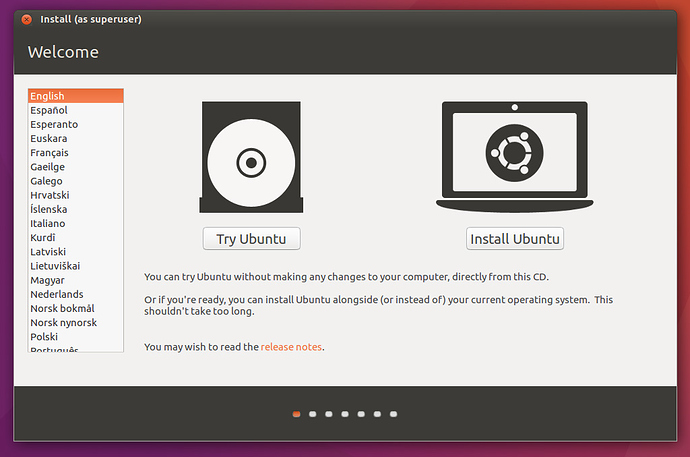
Select Install/Try(It doesn’t matter unless you really wanna play with it first for a bit). Remember to select something else in the installation choice step.
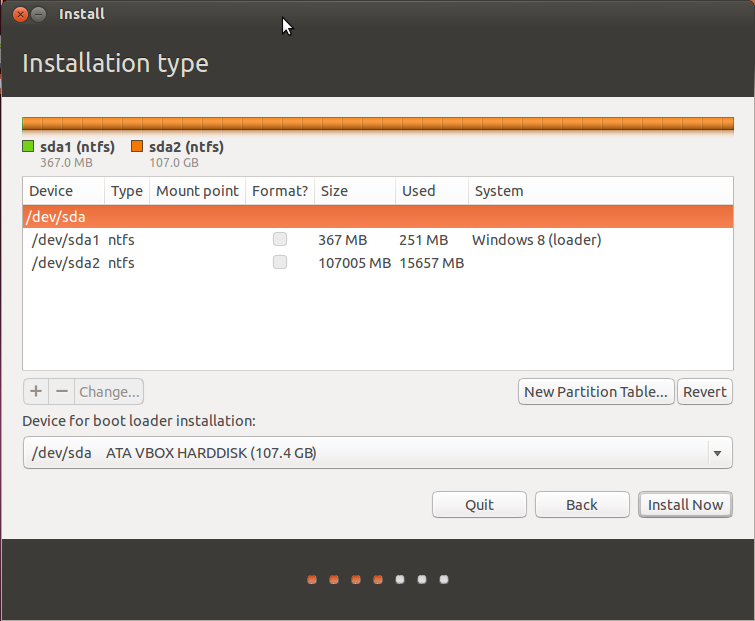
Note: There are many partition scheme online, choose the one that’s suitable! You can check partition guide here in official Ubuntu Wiki. And here’s mine just for your reference;
Also, you have always boot into live USB and adjust the system partition if you would like, be very careful tho ;-)
- swap: size of RAM, or twice the size;
- /: minimum is 8 GB, but it is recommended to have at least 15 GB; # system will be blocked if root is full
- /boot: 250 MB ~ 1 GB; # sometimes required, but do not use the same one for several Linux distros;
- /home: as large as possible, especially when you installed your Dropbox here, and have a lot of files; # if you don’t want a seperate home, just merge it with root;
Here’s my updated partition as in 2020; I allocated most of the space to /home cuz I will have my Dropbox and most of my side projects here. Also, I need to ensure the data is safe incase of a drive failure/upgrade. though the general consensus nowadays is to just use the /root which includes /home;
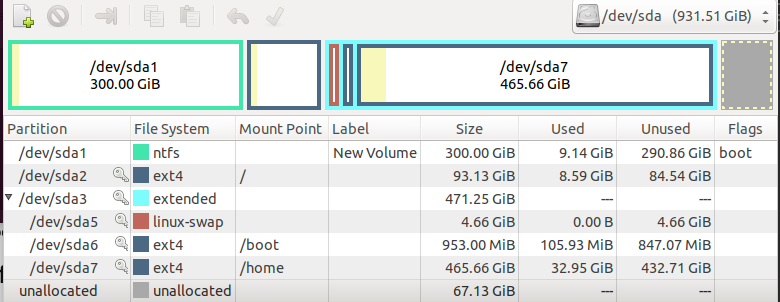
# 2020 June: This is my outdated partition, please check image above!
# on sda:
/dev/sda3  /     ext4  primary beginning  30GB
/dev/sda4  swap        logical beginning  5GB
/dev/sda5  /boot ext4  logical beginning  1GB
/dev/sda6  /home ext4  logical beginning  200GB

# make sure this is as large as possible
5. Use EasyBCD for boot loader
After installation, restart and enter Windows. Download EasyBCD(This is for BIOS) and add an entry:
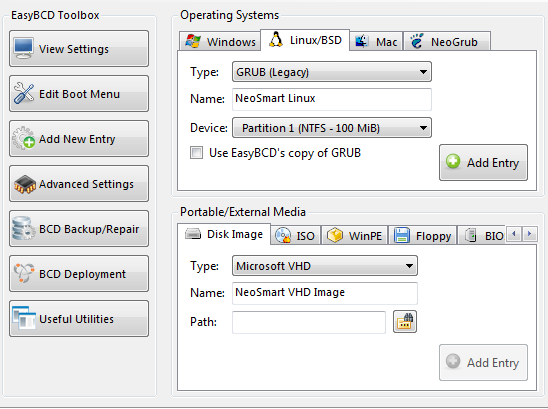
Add Entry: Linux/BSD
Type: GRUB(Legacy)
Name: define yourself
Bootloader: /boot partition # if you have a seperate /boot else just the ubuntu partition
Edit Menu: # Now you should have two entries, one Windows one Linux.
Then restart, now ou can choose OS as you wish!
6. SOME issues
a. Failed to load ldlinux.32
This happened the first time I tried to install Linux. I was a complete novice and knew nothing about deep-level OS. In general, this error can be caused by a lot of things: a broken USB port, corrupted ISO image, driver incompatibility…
For me it is because of the writing software, I switched from Ultral SO to Win32 Disk Manager and it all worked out. (But now it’s deprecated so I strongly suggest not to follow)
b. Underscore flashing on black screen after booting into newly installed Ubuntu
Something like this:

Grub issues.
This happened so many times I could recite all commands I tried in my sleep. Basically to repair it you can boot into live USB after installation and add repository of boot repair and run boot-repair; If it still does not work, try installing grub in your \boot partition.
sudo add-apt-repository ppa:yannubuntu/boot-repair
sudo apt-get update
sudo apt-get install -y boot-repair && boot-repair
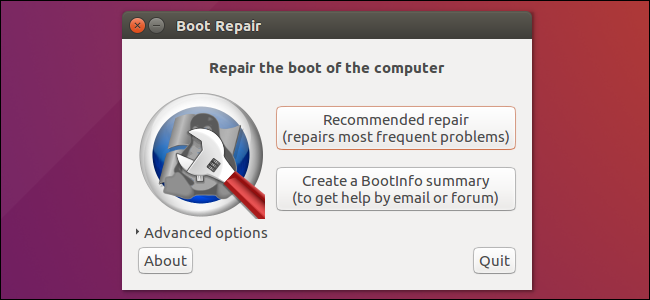
Note: sometimes you may get a notification before all the boot-repair starts, asking “if this drive** is the fixed drive?””, remeber to choose “No” if you are installing Ubuntu on your PC;
c. GRUB rescue mode
How to rescue a Non-booting GRUB 2 on Linux?
GRUB rescue mode.
This is also related to broken grub. It could happen after you reboot into Ubuntu partition. To fix it, simply run command below and check the /root partition.
grub rescue > ls
(hd0) (hd0,msdos5) (hd0,msdos3) (hd0,msdos2) (hd0,msdos1) (hd1) (hd1,msdos1)
grub rescue > ls (hd0,msdos1) # try to recognize which partition is this
grub rescue > ls (hd0,msdos2) # let's assume this is the linux partition
grub rescue > set root=(hd0,msdos2)
grub rescue > set prefix=(hd0,msdos2)/boot/grub # or wherever grub is installed
grub rescue > insmod normal # if this produced an error, reset root and prefix to something else ..
grub rescue > normal
Some Useful Links
“Welcome to the producer side!”
Leave a comment